Salted Chocolate Tart
by Nigella. Featured in SIMPLY NIGELLAIntroduction
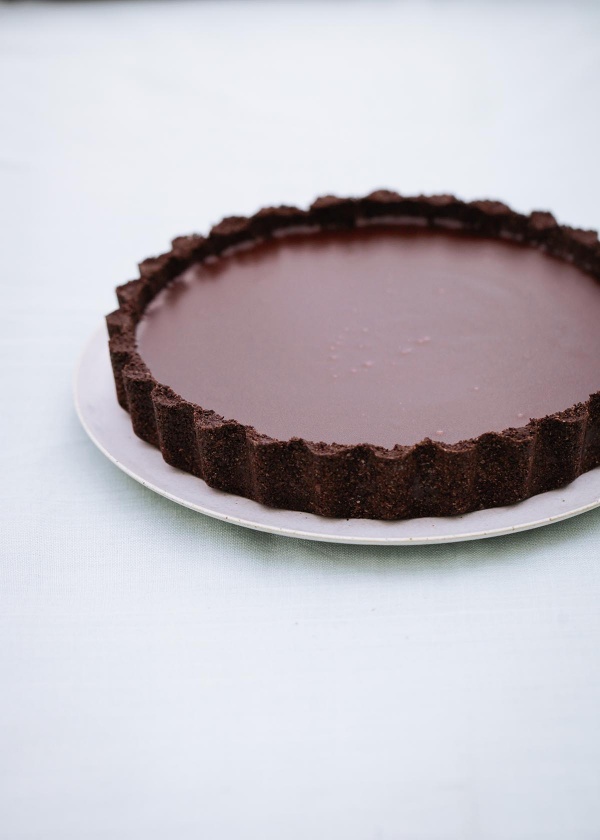
I have always avoided making chocolate tarts, not out of laziness (I love a bit of pastry-making, in the right mood), but because I have never really felt that the pastry served the chocolate, or was worth the effort here. This is my simple solution: make a base out of chocolate biscuits. And the filling is just as easy to make, too. Not that you’d know from the taste. I never lie about how effortless something is to make, but no one will believe me on this one. I think the hit of salt is crucial: it subtly counters the richness of all the chocolate. I go gladly for smoked sea salt here, but you can substitute regular sea salt flakes (not fine flowing salt, though) and, similarly, you could use Bourbon biscuits in place of the Oreos.
I have always avoided making chocolate tarts, not out of laziness (I love a bit of pastry-making, in the right mood), but because I have never really felt that the pastry served the chocolate, or was worth the effort here. This is my simple solution: make a base out of chocolate biscuits. And the filling is just as easy to make, too. Not that you’d know from the taste. I never lie about how effortless something is to make, but no one will believe me on this one. I think the hit of salt is crucial: it subtly counters the richness of all the chocolate. I go gladly for smoked sea salt here, but you can substitute regular sea salt flakes (not fine flowing salt, though) and, similarly, you could use Bourbon biscuits in place of the Oreos.

Share or save this
Ingredients
Serves: 14 slices
For the Base
- 28 oreo cookies (2 x 154g packets)
- 50 grams dark chocolate (min. 70% cocoa solids)
- 50 grams soft unsalted butter
- ½ teaspoon smoked sea salt flakes
For the Filling
- 100 grams dark chocolate (min. 70% cocoa solids)
- 25 grams cornflour
- 60 millilitres full fat milk
- 500 millilitres double cream
- 50 grams cocoa (sieved)
- 2 teaspoons instant espresso powder (or strong instant coffee powder)
- 75 grams caster sugar
- 1 teaspoon vanilla paste (or extract)
- 2 teaspoons extra virgin olive oil
- ¾ teaspoon smoked sea salt flakes
For the Base
- 28 oreo cookies (2 x 154g packets)
- 2 ounces bittersweet chocolate (min. 70% cocoa solids)
- 3 tablespoons soft unsalted butter
- ½ teaspoon smoked sea salt flakes
For the Filling
- 4 ounces bittersweet chocolate (min. 70% cocoa solids)
- 3 tablespoons cornstarch
- ¼ cup whole milk
- 2 cups heavy cream
- 7 tablespoons unsweetened cocoa (sieved)
- 2 teaspoons instant espresso powder (or strong instant coffee powder)
- ⅓ cup superfine sugar
- 1 teaspoon vanilla paste (or extract)
- 2 teaspoons extra virgin olive oil
- ¾ teaspoon smoked sea salt flakes
Method
You will need 1 x 23cm / 9in deep-sided (approx. 5cm / 2in deep), loose-bottomed flan tin.
For the base
- Snap the biscuits into pieces and drop them into the bowl of a food processor. Do likewise with the chocolate, then blitz them together until you have crumbs. Add the butter and salt, and blitz again until the mixture starts to clump together. If you’re doing this by hand, bash the biscuits in a freezer bag until they form crumbs, finely chop the chocolate and melt the butter, then mix everything, along with the salt, in a large bowl with a wooden spoon or your hands encased in disposable vinyl gloves.
- Press into your tart tin and pat down on the bottom and up the sides of the tin with your hands or the back of a spoon, so that the base and sides are evenly lined and smooth. Put into the fridge to chill and harden for at least 1 hour, or 2 hours if your fridge is stacked. I wouldn’t keep it for longer than a day like this as the Oreo crust tends to get too crumbly.
For the filling
- Finely chop the chocolate. Put the cornflour into a cup and whisk in the milk until smooth.
- Pour the cream into a heavy-based saucepan into which all the ingredients can fit and be stirred without splashing out of the pan, then add the finely chopped rubble of chocolate, the sieved cocoa (or just sieve it straight in), espresso or instant coffee powder, sugar, vanilla paste or extract, olive oil and smoked salt. Place over a medium to low heat and whisk gently — I use a very small whisk for this, as I’m not aiming to get air in the mixture, I’m just trying to banish any lumpiness — as the cream heats and the chocolate starts melting.
- Off the heat, whisk in the cornflour and milk mixture until it, too, is smoothly incorporated, and put the pan back on a low heat. With a wooden spoon, keep stirring until the mixture thickens, which it will do around the 10-minute mark, but be prepared for it to take a few minutes more or less. Take the pan off the heat every so often, still stirring, so that everything melds together, without the cream coming to a boil. When ready, it should be thick enough to coat the back of a wooden spoon, and if you run your finger through it (across the back of the spoon) the line should stay.
- Pour into a wide measuring jug or batter jug (it should come to about the 600ml/2 ½-cup mark). Now run a piece of baking parchment or greaseproof paper under the cold tap, wring it out and place the damp, crumpled piece right on top of the chocolate mixture, then put the jug into the fridge for 15 minutes. The mixture will still be warm, but will be the right temperature to ooze into the base without melting it.
- Pour and scrape the mixture into the biscuit-lined flan tin and put back in the fridge overnight. Don’t leave it longer than 24 hours, as the base will start to soften.
- Take out of the fridge for 10 minutes before serving, but unmould straight away. Sit the flan tin on top of a large tin or jar and let the ring part fall away, then transfer the dramatically revealed tart to a plate or board. Leave the tin base on.
- Slice modestly — this is rich and sweet, and people can always come back for more — and serve with crème fraîche; the sharpness is just right here. Leftovers will keep in the fridge for 4–5 days, but the base will soften and the sides crumble a bit. That will not detract from your eating pleasure too much, but I still like to give it its first outing at optimal stage!
You will need 1 x 23cm / 9in deep-sided (approx. 5cm / 2in deep), loose-bottomed flan tin.
For the base
- Snap the biscuits into pieces and drop them into the bowl of a food processor. Do likewise with the chocolate, then blitz them together until you have crumbs. Add the butter and salt, and blitz again until the mixture starts to clump together. If you’re doing this by hand, bash the biscuits in a freezer bag until they form crumbs, finely chop the chocolate and melt the butter, then mix everything, along with the salt, in a large bowl with a wooden spoon or your hands encased in disposable vinyl gloves.
- Press into your tart tin and pat down on the bottom and up the sides of the tin with your hands or the back of a spoon, so that the base and sides are evenly lined and smooth. Put into the fridge to chill and harden for at least 1 hour, or 2 hours if your fridge is stacked. I wouldn’t keep it for longer than a day like this as the Oreo crust tends to get too crumbly.
For the filling
- Finely chop the chocolate. Put the cornstarch into a cup and whisk in the milk until smooth.
- Pour the cream into a heavy-based saucepan into which all the ingredients can fit and be stirred without splashing out of the pan, then add the finely chopped rubble of chocolate, the sieved unsweetened cocoa (or just sieve it straight in), espresso or instant coffee powder, sugar, vanilla paste or extract, olive oil and smoked salt. Place over a medium to low heat and whisk gently — I use a very small whisk for this, as I’m not aiming to get air in the mixture, I’m just trying to banish any lumpiness — as the cream heats and the chocolate starts melting.
- Off the heat, whisk in the cornstarch and milk mixture until it, too, is smoothly incorporated, and put the pan back on a low heat. With a wooden spoon, keep stirring until the mixture thickens, which it will do around the 10-minute mark, but be prepared for it to take a few minutes more or less. Take the pan off the heat every so often, still stirring, so that everything melds together, without the cream coming to a boil. When ready, it should be thick enough to coat the back of a wooden spoon, and if you run your finger through it (across the back of the spoon) the line should stay.
- Pour into a wide measuring jug or batter jug (it should come to about the 600ml/2 ½-cup mark). Now run a piece of baking parchment or greaseproof paper under the cold tap, wring it out and place the damp, crumpled piece right on top of the chocolate mixture, then put the jug into the fridge for 15 minutes. The mixture will still be warm, but will be the right temperature to ooze into the base without melting it.
- Pour and scrape the mixture into the biscuit-lined flan tin and put back in the fridge overnight. Don’t leave it longer than 24 hours, as the base will start to soften.
- Take out of the fridge for 10 minutes before serving, but unmould straight away. Sit the flan tin on top of a large tin or jar and let the ring part fall away, then transfer the dramatically revealed tart to a plate or board. Leave the tin base on.
- Slice modestly — this is rich and sweet, and people can always come back for more — and serve with crème fraîche; the sharpness is just right here. Leftovers will keep in the fridge for 4–5 days, but the base will soften and the sides crumble a bit. That will not detract from your eating pleasure too much, but I still like to give it its first outing at optimal stage!
Additional Information
MAKE AHEAD:
Base can be made 1 day ahead. When firm, cover and keep refrigerated until needed. Tart/filling can be made 1 day ahead. Fill tart and refrigerate overnight, until set. Tent with foil, trying not to touch the surface of the tart.
STORE:
Store the tart in fridge until needed. Leftovers will keep in fridge for 4–5 days. The base will soften gradually as the tart stands.


Tell us what you think
Thank you {% member.data['first-name'] %}.
Explore more recipesYour comment has been submitted.
What 15 Others have said
-
Posted by Julia_Gulia on 29th December 2021
-
Posted by Rozplants on 16th October 2021
-
Posted by Sheharyar on 28th March 2021
-
Posted by joshv41680 on 15th February 2021
-
Posted by Brinkley4 on 1st November 2020
-
Posted by Lady_Mac on 13th August 2020
-
Posted by Sweetcakes1960 on 6th July 2019
-
Posted by bakinginthedeep on 16th May 2019
-
Posted by LozzyS on 17th March 2019
-
Posted by Madge2017 on 28th August 2018
-
Posted by kulinar on 8th August 2018
-
Posted by tamsinh on 7th June 2018
Show more commentsI made this for my Christmas Day dessert and it was absolutely brilliant! Very easy but also a real showstopper. I gave it a festive look by placing baking paper stars on top, spraying with gold lustre, then removing the stars. I love how the recipe uses the entire Oreo, as bases I’ve made before suggest removing the cream, which results in a very hard base. I melted the butter even though I was using a food processor, and it seemed to help the ingredients combine nicely. The filling is rich, creamy and super smooth, a chocolate lover’s dream. I used standard gold-blend instant coffee, which enhanced the flavour without actually making it taste of coffee, and used standard sea salt flakes in both the base and filling. The result was so delicious, I can’t actually believe there’s still some left.
Agree with everyone; this is absolutely delicious and looks sensational. Nigella, you are simply the best!
Incredibly rich and sumptuous, and frankly, the best chocolate tart I've had yet. The hit of salt and espresso is wonderful. The recipe is also exceedingly simple and easy to follow—so much so that I managed to put it together on quite a hectic afternoon whilst juggling various different tasks. Though I cooled the Oreo base for several hours in the fridge, it was still crumbly and didn't quite hold whilst serving. My guests simply crumbled the pieces on top of the chocolate ganache, making for a rather non-tart like eating experience, but it was still absolutely delicious.
This tart is one of the most popular things that I have made for guests. The combination of rich chocolate, bitter espresso and the smoky salt is so interesting and delicious. As Nigella suggests, I always serve some creme fraiche along side. It is also very elegant and impressive to serve. This, combined with its ease of preparation, make it a treat that I turn to often!
So easy to make , I used dark sea salt chocolate worked well , very rich & I made a cherry coulis to accompany it ..bliss
I used plain vanilla biscuits in the base along with the cocoa and chocolate and it worked well with the salted filling (I don’t really like Oreos ) . I also left out the coffee and added a slug of bourbon which was delicious.
Made this today for my husband he's a chocoholic, it was amazing smooth rich only needed a small slice. He's already saying about the next one! He hasn't finished this yet lol
Delicious!!! This recipe works 100% for those who enjoy an elegant chocolate dessert with just the right amount of salt - this is it.
A real “wow” dessert! The base is so much better than pastry. Delicious!
I made this tart this weekend and everyone thought it was wonderful and were swooning :-)
I made this how many times I can't remember. Everytime it is incredible tasty. But I don't use cornflour. Instead, I use normal flour. Because, in my opinion, the cornflour dulls the taste of the chocolate. After the first time I always used regular flour. Maybe I can't find the right cornflour in my country. Everyone adores this tart... it is incredible. I highly recomend it. I make small ones too, then wrap with clingfilm well, freeze up to 4months. Take out, wait couple of minutes, then eat....and tastes just as good as freshly made.
Beware: once you make this tart, your friends will keep asking you to make it and look very disappointed if you suggest making anything else. #battlestoriesfromthekitchen