
Maritozzi
by NigellaIntroduction
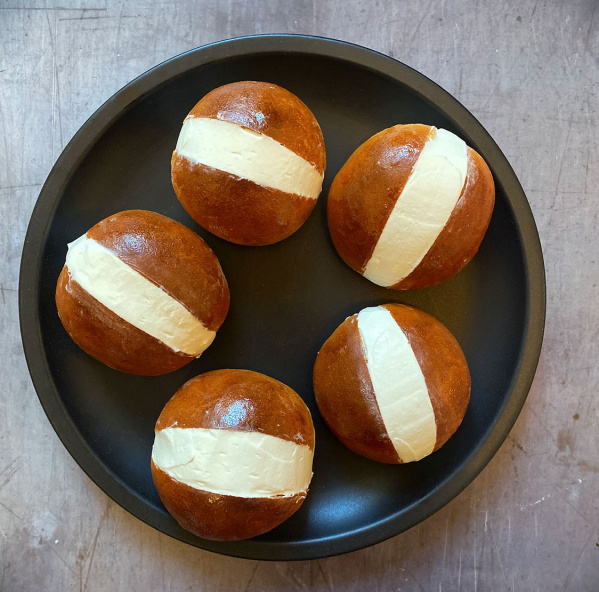
I’ve never met a cream bun I don’t like, but Maritozzi (pronounced, give or take, ‘marry tottsy’) are a particular favourite. They are a joy to the eye – these bulging, glossy buns, filled with slightly sweetened whipped cream, forming a stripe down the middle – and even more of a joy to taste. Although you can see them in Italian bakeries all year round these days, they are in fact a traditional Roman Easter offering, and it is in this guise that I bring them to your attention now.
These maritozzi are smaller than you might see at an Italian bakery these days: enticing as they look, they are pretty much impossible to eat, and it’s hard to keep the balance of bun and cream. These babies, I feel, get it just right!
My method is reassuringly low effort: as far as kneading is concerned, all that’s required is three 10-second kneads at 10 minute intervals. Even if you’ve never baked with yeast before, you’ll find this all a breeze.
Ingredients
Makes: 8 maritozzi
FOR THE SPONGE
- 125 grams full fat milk
- 25 grams strong white bread flour
- 2 teaspoons caster sugar
- 7 grams instant or other active dry yeast
FOR THE MAIN DOUGH
- 225 grams strong white bread flour (plus up to 25g/2 tablespoons more)
- 25 grams caster sugar
- ¼ teaspoon fine sea salt
- 1 large egg (at room temperature)
- 30 grams olive oil (plus a little more for the kitchen surface)
- finely grated zest of ½ orange
- finely grated zest of ½ unwaxed lemon
FOR THE GLAZE
- 2 tablespoons water
- 2 tablespoons caster sugar
FOR THE FILLING
- 200 millilitres double cream
- 2 teaspoons icing sugar (sieved)
FOR THE SPONGE
- ½ cup whole milk
- 2 tablespoons strong white bread flour
- 2 teaspoons superfine sugar
- ¼ ounce instant or other active dry yeast
FOR THE MAIN DOUGH
- 1¾ cups plus 1 tablespoon strong white bread flour (plus up to 25g/2 tablespoons more)
- 2 tablespoons superfine sugar
- ¼ teaspoon fine sea salt
- 1 large egg (at room temperature)
- 2 tablespoons olive oil (plus a little more for the kitchen surface)
- finely grated zest of ½ orange
- finely grated zest of ½ unwaxed lemon
FOR THE GLAZE
- 2 tablespoons water
- 2 tablespoons superfine sugar
FOR THE FILLING
- ¾ cup plus 1 tablespoon heavy cream
- 2 teaspoons confectioners' sugar (sieved)
Method
- To make the sponge, first warm the milk to about 38ºC/100ºF. If you don’t have a thermometer, just aim for slightly above body temperature: it needs to feel warm rather than hot when you dip a finger in. I find that 30 seconds in the microwave at 900W (with milk straight from the fridge) does the trick.
- Mix the 25g / 2 tablespoons flour, 2 teaspoons caster sugar, and sachet of yeast in a bowl and then, once your milk is at the correct temperature, whisk it in. Leave for 20 minutes, by which time it will have risen and thickened and look rather like puffy porridge.
- The sponge done, it’s time to get on with the main dough. Mix the main dough flour (225g / 1¾ cups plus 1 tablespoon) with the sugar and salt in a large mixing bowl. Add the risen sponge mixture and mix by hand with a spoon or large spatula. Whisk together the egg and olive oil and mix that in, too, followed by the finely grated orange and lemon zest, until a messy, soft clump of dough starts to form. It will be sticky, but you don’t want it too wet, so if the dough won’t form into a rough ball, gradually add more flour until it just about does. You certainly shouldn’t need more than an extra 25g / 2 tablespoons – most likely it’ll be less.
- Leave the ramshackle dough ball in the bowl, cover, and leave for 10 minutes. Then, pour a little oil over the kitchen surface, spread it out with your hand to cover a space the size of a chopping board thinly (don’t create an oil slick) for you to knead on.
- Knead the dough by hand for 10 seconds – the first knead will be the stickiest! – then form it into a ball again, pop it back in its bowl, cover again and leave for another 10 minutes. Then, knead it again for 10 seconds (adding a little more oil to the kitchen surface if needed) before reforming into a ball, and leaving it covered in its bowl for another 10 minutes. Then do your third and final 10-second knead – you will feel how much more springy and alive your dough is to the touch now! Form into a neat ball and leave it in a warmish place for an hour, or until it’s risen voluminously and is at least doubled in size; if it’s cold in your kitchen, it will just take longer. While the dough’s proving, line a flat baking sheet with baking parchment.
- When your dough is ready, divide it equally into 8 pieces of about 60g / 2½ oz each. Shape each piece of dough into a small round ball, and put each ball onto the baking parchment lined sheet, leaving a 4-5cm / 1½-2 inch gap between each.
- Cover the eight little dough balls with a tea towel and leave for 30–45 minutes (depending on how warm it is) until they have risen more and look puffy.
- For the glaze, put the water and sugar for the glaze into a small saucepan and heat to a bubble, then boil the mixture for 1 minute before taking it off the heat.
- When you are nearing the final 30 minutes of proving time, heat the oven to 200ºC/180ºC fan/400ºF. Uncover the puffy buns and then cook in the oven for 12-14 minutes, by which time they will be dark gold and firm on top. Turn one over and give it a tap – it should feel light and hollow.
- When the buns are ready, take them out and put them onto a cooling rack. Use a pastry brush to paint them generously with the sugar syrup glaze to make them very glossy. You can use the sheet of baking parchment the buns were on, under the rack to catch drips. Once they are all glazed, leave to cool.
- When the buns are cool, whip the cream and icing sugar until softly thickened and airy, but not stiff, and then cut the buns with a bread knife, from the top downwards, nearly all the way through but still joined together at the bottom.
- Prising the halves apart a little, and fanning them out more at the top, use a teaspoon to fill each bun with a stripe of cream, then smooth the cream with a small cranked palette knife so that it sits neatly flush with the top of the bun, wiping away any overspill. Once filled, these are best eaten straightaway, or within a couple of hours.
- To make the sponge, first warm the milk to about 38ºC/100ºF. If you don’t have a thermometer, just aim for slightly above body temperature: it needs to feel warm rather than hot when you dip a finger in. I find that 30 seconds in the microwave at 900W (with milk straight from the fridge) does the trick.
- Mix the 25g / 2 tablespoons flour, 2 teaspoons superfine sugar, and sachet of yeast in a bowl and then, once your milk is at the correct temperature, whisk it in. Leave for 20 minutes, by which time it will have risen and thickened and look rather like puffy porridge.
- The sponge done, it’s time to get on with the main dough. Mix the main dough flour (225g / 1¾ cups plus 1 tablespoon) with the sugar and salt in a large mixing bowl. Add the risen sponge mixture and mix by hand with a spoon or large spatula. Whisk together the egg and olive oil and mix that in, too, followed by the finely grated orange and lemon zest, until a messy, soft clump of dough starts to form. It will be sticky, but you don’t want it too wet, so if the dough won’t form into a rough ball, gradually add more flour until it just about does. You certainly shouldn’t need more than an extra 25g / 2 tablespoons – most likely it’ll be less.
- Leave the ramshackle dough ball in the bowl, cover, and leave for 10 minutes. Then, pour a little oil over the kitchen surface, spread it out with your hand to cover a space the size of a chopping board thinly (don’t create an oil slick) for you to knead on.
- Knead the dough by hand for 10 seconds – the first knead will be the stickiest! – then form it into a ball again, pop it back in its bowl, cover again and leave for another 10 minutes. Then, knead it again for 10 seconds (adding a little more oil to the kitchen surface if needed) before reforming into a ball, and leaving it covered in its bowl for another 10 minutes. Then do your third and final 10-second knead – you will feel how much more springy and alive your dough is to the touch now! Form into a neat ball and leave it in a warmish place for an hour, or until it’s risen voluminously and is at least doubled in size; if it’s cold in your kitchen, it will just take longer. While the dough’s proving, line a flat baking sheet with baking parchment.
- When your dough is ready, divide it equally into 8 pieces of about 60g / 2½ oz each. Shape each piece of dough into a small round ball, and put each ball onto the baking parchment lined sheet, leaving a 4-5cm / 1½-2 inch gap between each.
- Cover the eight little dough balls with a tea towel and leave for 30–45 minutes (depending on how warm it is) until they have risen more and look puffy.
- For the glaze, put the water and sugar for the glaze into a small saucepan and heat to a bubble, then boil the mixture for 1 minute before taking it off the heat.
- When you are nearing the final 30 minutes of proving time, heat the oven to 200ºC/180ºC fan/400ºF. Uncover the puffy buns and then cook in the oven for 12-14 minutes, by which time they will be dark gold and firm on top. Turn one over and give it a tap – it should feel light and hollow.
- When the buns are ready, take them out and put them onto a cooling rack. Use a pastry brush to paint them generously with the sugar syrup glaze to make them very glossy. You can use the sheet of baking parchment the buns were on, under the rack to catch drips. Once they are all glazed, leave to cool.
- When the buns are cool, whip the cream and confectioners' sugar until softly thickened and airy, but not stiff, and then cut the buns with a bread knife, from the top downwards, nearly all the way through but still joined together at the bottom.
- Prising the halves apart a little, and fanning them out more at the top, use a teaspoon to fill each bun with a stripe of cream, then smooth the cream with a small cranked palette knife so that it sits neatly flush with the top of the bun, wiping away any overspill. Once filled, these are best eaten straightaway, or within a couple of hours.
Additional Information
MAKE AHEAD / STORE:
Once filled, these are best eaten straightaway, or within a couple of hours. If you absolutely need to, you can bake them a day ahead if you leave them whole and wrapped airtight (though they will lose most of their gloss) then split and fill with cream just before serving.
The maritozzi can also be frozen, unfilled. Freeze the completely cooled buns in a resealable bag or airtight container for up to 3 months. Thaw at room temperature for 3-4 hours and fill and serve on the same day. Please note that when the buns thaw, the glaze will lose a bit of its shine.


Tell us what you think
Thank you {% member.data['first-name'] %}.
Explore more recipesYour comment has been submitted.